
Update 8/12/2022
- If you interested in using the new Esri Survey123 Connector instead of doing it by hand (as done below), please see the following:
- If you interested in adding security to your Survey123 webhook in Power Automate, here is a new blog on how to implement https://www.dvginteractive.com/arcgis-survey123-webhook-power-automate-token-security/
Esri’s Survey123 (S123) enables rapid development and deployment of web and mobile based spatially-enabled surveys. In addition to the standard OOB functionality, the surveys can be customized and extended using technology such as Survey123 connect, or AppStudio. A recently released addition to S123 was the “Webhook” functionality which enables integration with automation technologies such as Microsoft Power Automate and Integromat, that have already build connectors for S123. These are great, but we have use cases where Azure Logic Apps are a better fit. So, this post will provide some steps for setting up S123 and integrating it with Azure Logic Apps via S123 Webhooks. This post will also show you how to enable security on your Logic App endpoint, and provide some guidance on security options. Our example use case will be a public health organization monitoring a disease outbreak.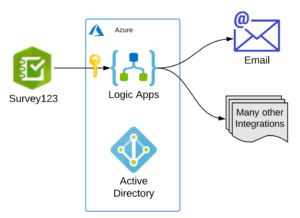
Prerequisites
- An ArcGIS Online account. If you don’t have one, you can get a free developer account here – https://developers.arcgis.com/
- A Microsoft Azure account. If you don’t have one, you can get a trial account here – https://azure.microsoft.com/en-us/free/
Create a Survey
- Login to your ArcGIS Online account and create a survey. https://survey123.arcgis.com/
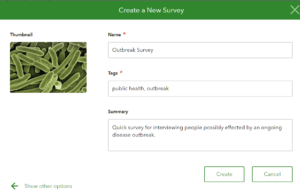
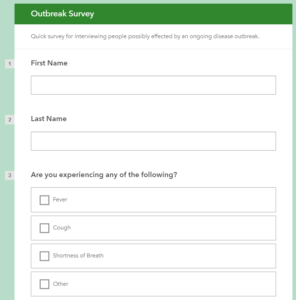
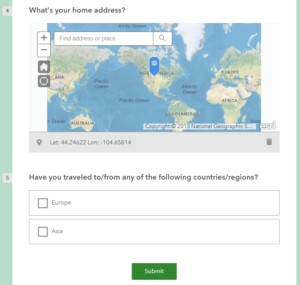
- Create some questions that will help the organization quickly evaluate potential people that may have been exposed to the outbreak. Here, I created 5. Once you’re done, Save and Publish it.
Create the Logic App
- In the Azure Portal, go ahead and create a new Logic App. Take the defaults, including using the system assigned identity (more on this later).
- Once the logic app is ready (this takes 1-5 minutes), go to the designer and create an HTTP Request Received trigger that accepts a POST. Then, add a Response step that just passes back the Body and Headers of the request. (use the dynamic content pane to add these). This can be anything you want, as S123 doesn’t do anything with the response data. Then, add the Send an Email (V2) step. I just added my personal email for this demo, but you can configure this to use a shared mailbox and send to lists of dynamic users.
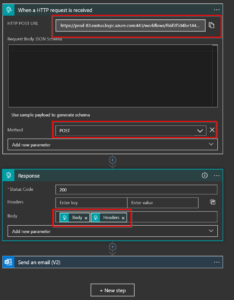
- Now, Copy the URL from the HTTP POST URL box. We will use this over in S123 as the URL for our webhook.
- Some notes about security and availabillity
- This URL is open to EVERYONE on the internet.
- There is no access control or authentication enabled.
- Some good news…Logic Apps have an SLA with 99.9% uptime.
- More good news, on top of 99.9% uptime, you get a 330+ requests per second throughput (this can be increased) as well as a pretty generous data throughput that should meet the needs of most use cases. Check the doc for the details here – https://docs.microsoft.com/en-us/azure/logic-apps/logic-apps-limits-and-config.
Create the S123 Webhook
- Go back to S123 in your web browser.
- To create the webhook go to Settings > Webhooks > Create Webhook.
- Give your webhook a name, paste in the URL to the Logic App endpoint, and select all the payload info that you would like to send. Click Save.

- Make sure you set the sharing appropriately in the Collaborate tab. You can also get a link in the Collaborate tab that enables opening the survey in the web browser.
- That was quick! We can run some tests now. Note: any updates made to your S123 app, users must re-download the survey to their device to get fresh webhook URLs and/or any other changes that were made to the survey.
Test Your Survey 123 to Logic App Flow
- Open up your survey and fill it out. I put in that John Doe has a fever and a cough. He lives in Brooklyn. And recently traveled from Europe. Submit the survey.

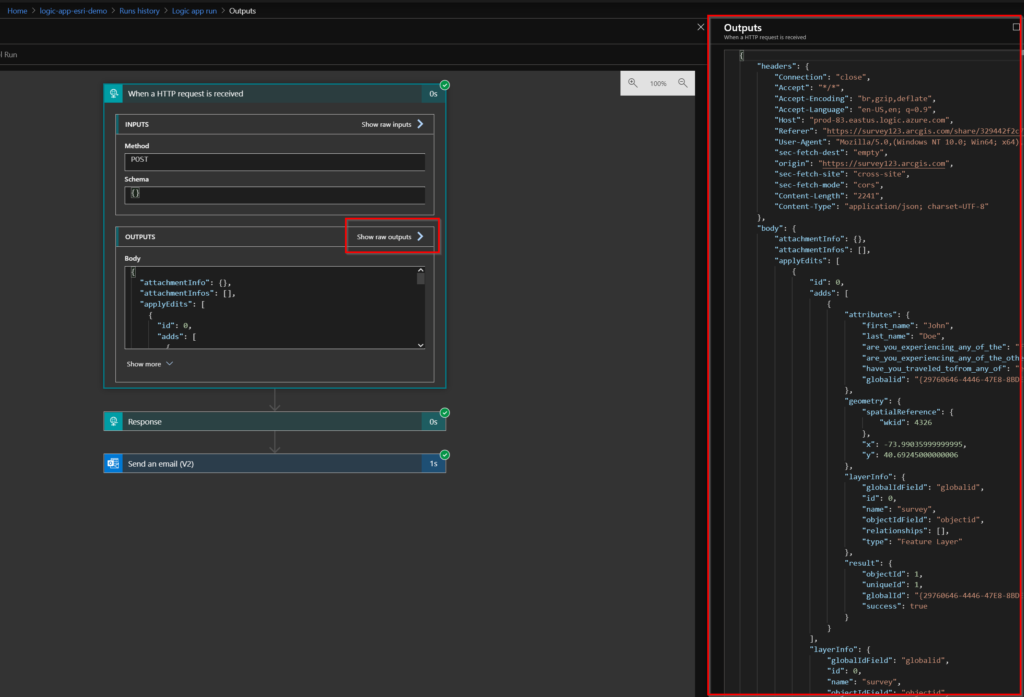
- Go over to the Logic App Overview. On the bottom in the Overview pane, take a look at the run history. You can see that the Logic App was triggered and ran successfully. You should have also received an email notification.

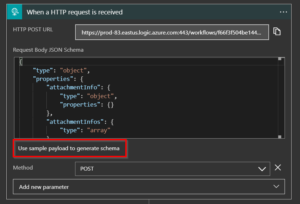
- Now, let’s take a closer look at the POST body that was sent to the Logic App from S123. Now, you can inspect all of the data that are sent to the Logic App by clicking the Show Raw Outputs. You can use these data to refine the Schema property for the HTTP trigger. This will enable you to use the key/value pairs in the JSON as dynamic input in later steps.
 Lets take a closer look at the payload. As you can see below, the attributes from our fields have been passed through to the Logic App. We can now use this information for subsequent analysis and automation rules.
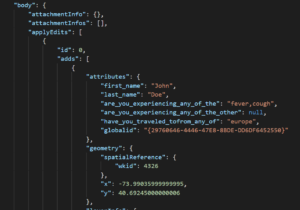
- Now, update the Schema by clicking Use sample payload to generate schema and save it.
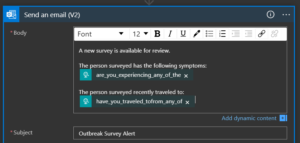
- Now, I can configure the automated email to use dynamic content in the body of the email.
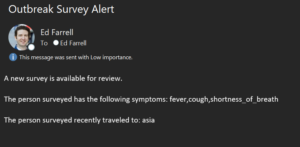
- Run the survey again. This time Jane Doe has fever, cough, and shortness of breath. She recently traveled to Asia
Checkpoint & Summary
At this point, you are up and running. This configuration may meet your use case. If it does, you can stop reading!! However, you may need some additional security added to your Logic App. The next section will cover securing your Logic App. Warning this get’s a little technical, but it’s worth it if you need to restrict access and have elevated level of security…which your IT/Security department will most likely require for a production deployment.
You may also want to authenticate to ArcGIS Online, to take some other action on a hosted feature service. If you want to authenticate to the Esri Portal, use can use the token parameter to make queries. Here is a nice blog about how to to that – https://resources.esri.ca/getting-technical/webhooks-microsoft-flow-and-the-arcgis-rest-api-automating-your-web-gis.
Securing The Logic App – Strategies
There are a few strategies for securing logic apps. Here is a list of the major ones. Keep in mind that some of these can be combined. Here is the Azure doc on this https://docs.microsoft.com/en-us/azure/logic-apps/logic-apps-securing-a-logic-app
- Restrict incoming IP addresses and ranges. Logic apps support this for IPv4 and IPv6.
- Control access using shared access signatures (SAS).
- Use Azure API Management (APIM) to act as the “front end” for the Logic App. APIM has lots of great features for managing APIs. Here’s some documentation on how to do this https://docs.microsoft.com/en-us/azure/api-management/import-logic-app-as-api.
- Use an Azure Function App as a “proxy” front end, with Logic as the back end. . Depending on the use case, this can add some additional configuration that may help.
Securing The Logic App with a Service Principal & SAS Token
Shared access signatures are a great way to provide access to users that you trust to do very limited operations against your service. You probably don’t want these users to be able to make changes, but you do want them to be able to read or write to the service, perhaps for only a limited amount of time. SAS is perfect for this situation because you can delegate access using the principal of least privilege. For a more complete discussion, please see the Azure docs – https://docs.microsoft.com/en-us/azure/storage/common/storage-sas-overview. You will need an Azure account that has privileges to create AD accounts for this section. Let’s get started!
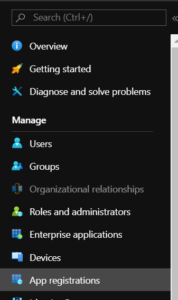
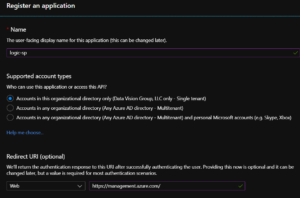
- Create a “service principal” (SP) identity in Azure AD. A service principal is an AD account that is designed for application/service access, rather than a human being. It allows us to use this account for the very limited and strictly intended purpose of authentication and very limited privileges that ONLY extend to the Logic App, and nothing else. I’m not going to go into the details here, but if you want to know more please check out the docs here – https://docs.microsoft.com/en-us/azure/active-directory/develop/app-objects-and-service-principals. In the Azure Portal, go to Azure Active Directory > App Registrations > + New Registrations. This will launch a new blade where you can fill in the details of the for the SP app. Name your SP whatever you want. Then choose a Redirect URI. I used https://management.azure.com/ but this can be changed later.
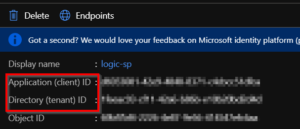
- Now take note of the Application ID and Directory ID on the Overview blade. Copy/paste these somewhere. You will need these for requesting an access token.
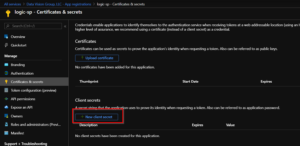
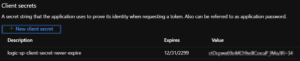
- Now you need to create a new client secret. This is another piece of info that is needed for authentication. Back on the App Registrations menu, go the Manage > Certificates & Secrets > + New Client Secret. Set it to expire whenever you like. Once you create it. Copy paste the value somewhere.
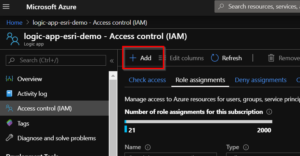
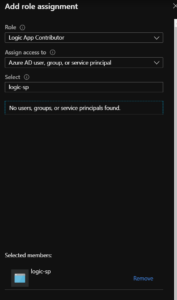
- Now, we have a SP account setup. However, it does not have access or permissions to do anything. So, let’s go back over to the Logic App and add the “logic-sp” SP account to the “Logic App Contributor” role in IAM. Once there (see image below), click the +Add > Add Role Assignment. Then, add the logic-sp service principle account to the Logic App Contributor role and click Save. Now the SP account has access to the Logic app for authentication.
- Now the SP has contributor permission to the Logic App. However, the Logic app is still open to the public. To disable this and force authentication through a shared access signature (SAS), we will 1) request an OAuth 2.0 bearer token that can be used to authenticate our SP account against our Logic app, then 2) we will use the token to generate a SAS URL and token for a specific date range, and 3) we will use the SAS URL to send authenticated and secure requests to our Logic app HTTP trigger from Survey 123.
- Get a token. In Postman use this URL, inserting your tenant id.
https://login.microsoftonline.com/[TENANT_ID]/oauth2/token. You can find your TENANT_ID by going to Azure Active Directory > Properties. The TENANT_ID is the “Directory ID”.
- Generate SAS URI. Now you can take that
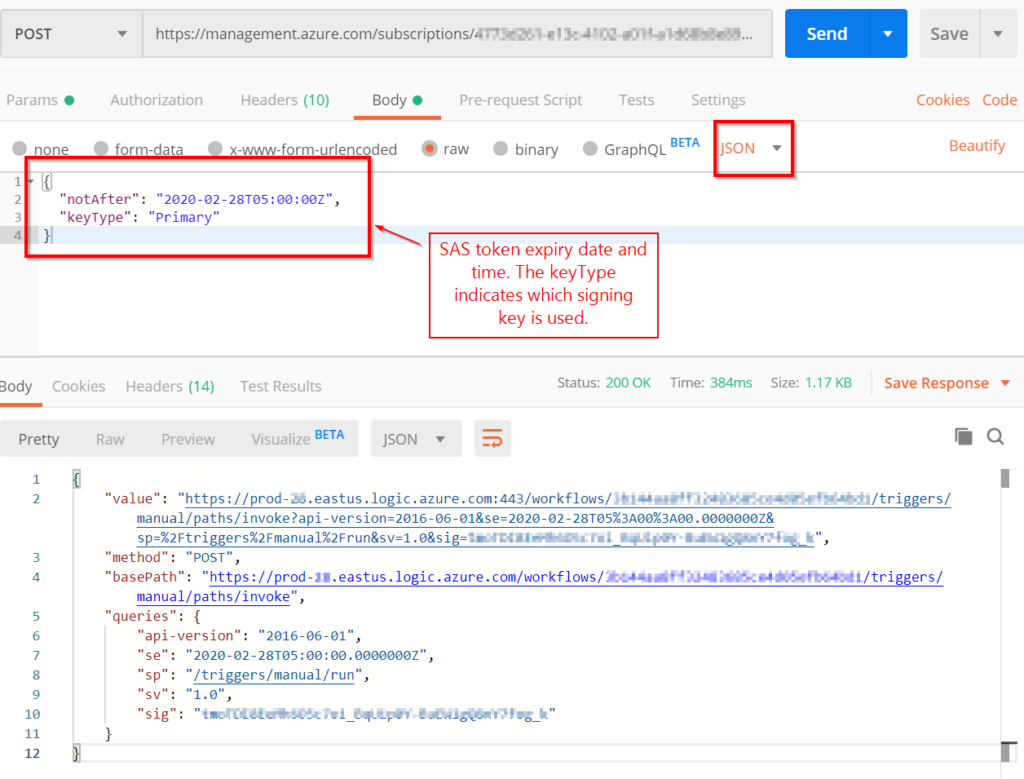
access_tokenand use it to generate a SAS token and URI. To do this you need to generate the URI by making a REST API call to thelistCallbackUrlmethod (doc here) for the Logic App. The format for that URL is POSThttps://management.azure.com/subscriptions/{subscriptionId}/resourceGroups/{resourceGroupName}/providers/Microsoft.Logic/workflows/{workflowName}/versions/{versionId}/triggers/{triggerName}/listCallbackUrl?api-version=2016-06-01. Also, use the access_token in the “Authorization” header. Remember to prefix it with “Bearer ” (see image below). The response gives us the signature assig, and the full SAS URI in thevalueparameter. Now you can use the URI to make requests to your Logic App HTTP trigger endpoint.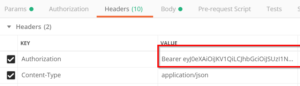
- Update Survey123 Webhook Setting. Now that you have the SAS URI. You can use it (until it expires). Next, go over to Survey123 and update the Webhook URL (just like before). Note: you’ll need to re-download the survey onto your mobile device after you update the webhook URL.
- Securely Trigger the Logic App from Survey123. Submit a new survey to test that it’s working. It will show up as a recent “run”.

Summary
We now have a secure Logic app workflow running that is integrated with and triggered by Esri Survey123. Some notes:
- The Logic App is secured using a Azure Service Principal account using a least-privilege approach.
- The Logic App is secured using the shared access signature (SAS) approach. Anyone who you share the SAS token with or the URI will be able to make calls to your Logic App endpoint.
- You could increase security by:
- Restricting IPs
- Integrating with Azure API Management
- Integrating with Azure web application firewall (WAF) and/or Traffic Manager (to filter traffic).
- Only sharing your Survey with trusted users (i.e. blocking public access).
- Rotating the SAS tokens periodically. Or, regenerating your Logic App Access Keys. Doing this will invalidate all SAS tokens issued with those keys.
- I’m sure there’s more…but it will depend on the specifics of the situation.
- By the way, we could have done all of the SP and SAS using the Azure CLI.
Please reach out to me if you have any further ideas on how to improve or extend this blog post, or if this was helpful. Happy surveying!!!