
If you’ve been editing in ArcGIS Pro for some time, you’ve probably heard of ArcGIS Attribute Rules. Maybe you’re coming from ArcMap and you’ve even used the Attribute Assistant add-in in the past. Regardless of where you’re coming from, if you’re not currently leveraging ArcGIS Attribute Rules in your data editing environment, you might want to consider it. We’ll showcase some simple examples you can leverage to get off the mark.
Attribute Rules in ArcGIS Pro
Attribute rules are complimentary to and an extension of the regular geodatabase features that allow you to maintain data integrity (such as subtypes and domains). They can be configured on each feature class / table and are honored in feature layers in ArcGIS Online. With attribute rules you can create calculation rules with complex logic to automatically populate field values, use constraint rules to prevent improper field edits or validation rules to review your attributes and geometries using complex logic. Attribute rules use Esri’s new Arcade programming language that is very well documented and has tons of examples to get you started.
Creating Attribute Rules
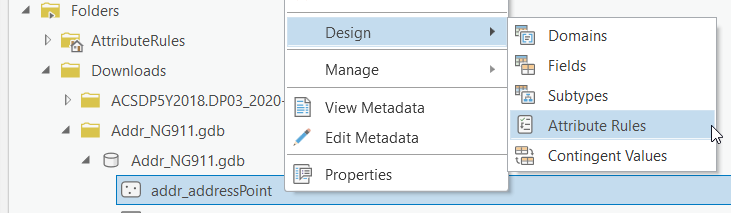
Creating an attribute rule on a layer or table is pretty straightforward. To set attribute rules for a layer or table, either:
a) Select the layer in the Catalog view, right-click and go to Design -> Attribute Rules
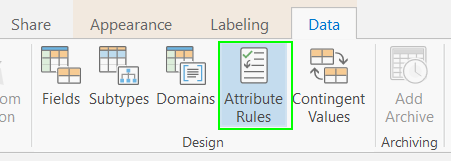
b) In a map session, select and highlight the layer in the table of contents, then click on Attribute Rules in the Data ribbon.
Below are some simple examples to get you started and get some ideas flowing. This is by no means exhaustive. Attribute rules pick up where domains and subtypes end, and are meant to extend validation and attribute entry using your own custom logic.
Example 1: Populate a Unique ID Field
In this example, let’s say you have a field of type GUID that you use for a unique ID in your feature class. Since GUID fields are not autopopulated, you were traditionally left with using the Field Calculator after a series of edits or building some custom application logic for editing. With an Immediate Calculation rule, you can ensure that the GUID field is automatically populated with a unique ID on the creation of any new records. Here’s how it works:
With the attribute rules window open for your feature class, click Add Rule and select Immediate Calculate Rule
In the rule editor, add a Rule Name & Description. For the Field parameter, select the GUID field you would like to calculate. Next, click on the Expression button.
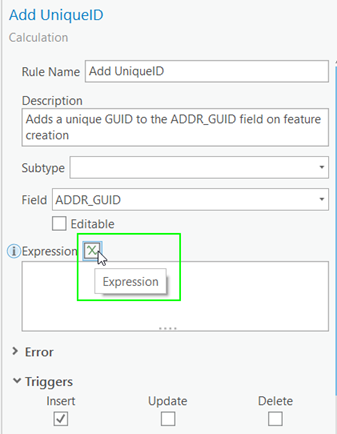
In the Expression builder, type in “return “ and select Guid() from the preset Functions list. Click OK to return to the Rule window.
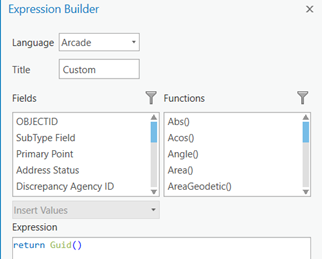
The Arcade Guid() function returns a unique ID in the format of ‘digits-hyphen-spaces’ ({db894515-ed21-4df1-af67-36232256f59a}). However, you also have the option of returning the following options:
– Guid(‘digits’)
– Guid(‘digits-hyphen’)
– Guid(‘digits-hyphen-parenthesis’)
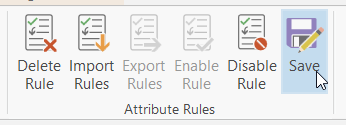
When you are done, make sure to hit Save in the Attribute Rules ribbon to save your new rule. Now whenever new features are added, the GUID field will autopopulate.
Example 2: Concatenate A Field From Other Fields
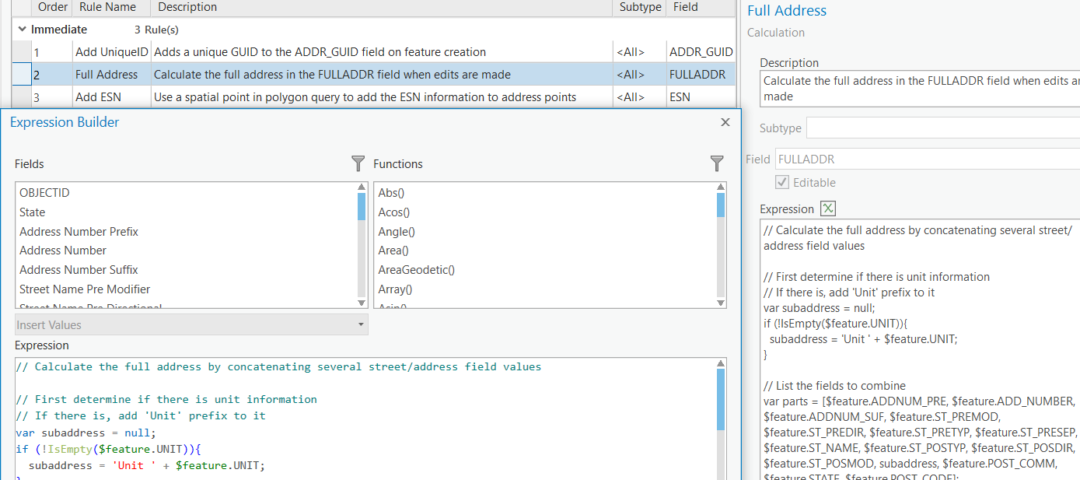
Another common requirement is to combine or concatenate fields in ArcGIS. You may have traditionally done this previously or in ArcMap by using the Calculate Field tool and/or some form of VB Script or Python. That all works fine, however it would be better if we could automate this field calculation on each edit. Let’s say you have an address point feature class. The feature class includes multiple street name and address parts fields. The feature class also includes a full address field (FULLADDR) which is created by concatenating the other street and address fields. Let’s create a rule to automate the calculation of this field.
– Add a new Immediate Calculation rule
– Add a rule name and description, set the Field parameter to FULLADDR.
– For the Triggers section, select Insert and Update
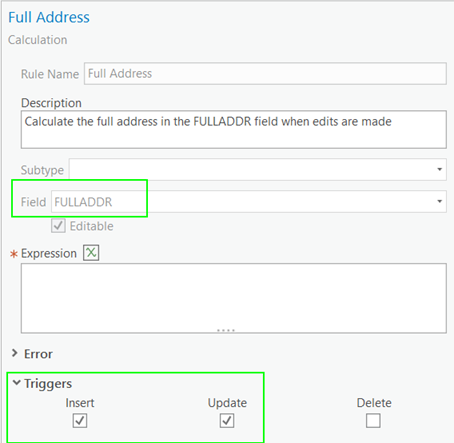
– In the Expression dialog paste the following code:
// Calculate the full address by concatenating several street/address field values

// First determine if there is unit information
// If there is, add 'Unit' prefix to it
var subaddress = null;
if (!IsEmpty($feature.UNIT)){
  subaddress = 'Unit ' + $feature.UNIT;
}

// List the fields to combine
var parts = [$feature.ADDNUM_PRE, $feature.ADD_NUMBER, $feature.ADDNUM_SUF, $feature.ST_PREMOD, $feature.ST_PREDIR, $feature.ST_PRETYP, $feature.ST_PRESEP, $feature.ST_NAME, $feature.ST_POSTYP, $feature.ST_POSDIR, $feature.ST_POSMOD, subaddress, $feature.POST_COMM, $feature.STATE, $feature.POST_CODE];

// Loop through the address parts, if not null or empty add them to a new array
var filteredparts = [];
for (var i in parts) {
    var value = parts[i];
    if (IsEmpty(value)) continue;
    filteredparts[Count(filteredparts)] = value
}

// Concatenate with a space
return Concatenate(filteredparts, " ");
This bit of code may seem overwhelming at first, but it makes sense once you break it down into smaller chunks. First, we create a subaddress variable for apt unit information if the record contains UNIT information. Second, we create a list/array of all the fields we want to concatenate. Third, we filter the list to only include fields with a value using the IsEmpty function. Lastly, we combine the items in the filtered list into one text using the Arcade Concatenate function.
Once you are done adding the arcade expression code. Click on the checkmark button to validate for any formatting errors. Click on OK and Save in the Attribute Rules ribbon to save your changes. Now whenever a user updates address and street fields, this rule will autocomplete the FULLADDR field.
Example 3: Grab a Value from an Intersecting Feature
In this example, say you have a separate layer with Emergency Service Zone boundaries that are maintained for 9-1-1 and public safety. Each zone boundary contains a unique ESN number that relates to the unique set of law enforcement, fire and first aid services. When creating and updating address points, it would be beneficial to update the address with its proper ESN number.
In this example, we will create an attribute rule to automatically update the ESN number for each address based on the intersecting zone boundary. In the Attribute Rules editor panel, add a new Immediate Calculation Rule. Make sure Insert & Update are checked for the allowable Triggers.
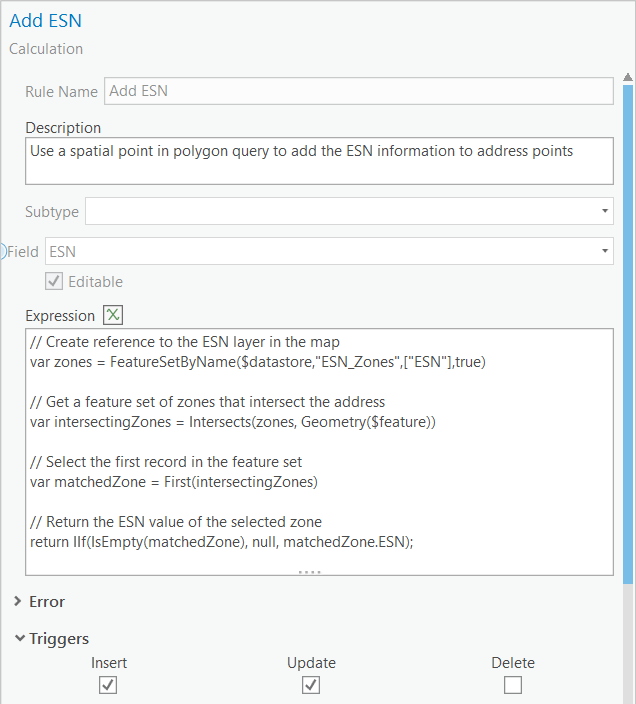
In the rule Expression, add the following code:
// Create reference to the ESN layer in the map
var zones = FeatureSetByName($datastore,"ESN_Zones",["ESN"],true)

// Get a feature set of zones that intersect the address
var intersectingZones = Intersects(zones, Geometry($feature))

// Select the first record in the feature set
var matchedZone = First(intersectingZones)

// Return the ESN value of the selected zone
return IIf(IsEmpty(matchedZone), null, matchedZone.ESN);
In short, this expression uses Arcade to find the ESN_Zones layer in the current map. Then it uses the Arcade Intersects function to select all ESN_Zones that intersect the address point. Finally, it uses the IIF logic function to return the ESN attribute of the selected ESN zone or null if there is no intersecting zone boundary.
Summary
There are plenty of other spatial functions available so this is just the tip of the iceberg in terms of what types of spatial relationships you can leverage in your calculations. These are just a few of the examples of what ArcGIS Attribute rules can do. Consider it a major upgrade from Attribute Assistant; an upgrade that can substantially increase your editing efficiency and data integrity. Hooray for less work and cleaner data! In the next section, we will dive into some more complex examples.