

- Part 1
- Create an Azure Resource Group
- Create a Azure Virtual Network
- Create Azure Virtual Network Gateway
- Part 2
- Create & add certificates to the network gateway
- Connect to the network using a VPN
- Part 3
- Build a VM
- Install & Configure ESRI Licence Server
The purpose of this series of posts is to demonstrate how to build a hosting environment for ESRI Licence Server in Microsoft’s Azure cloud environment. Every organization that is running ESRI ArcGIS Desktop products either administer licences as “single-use” or “concurrent”. Many choose the concurrent model (the focus of this post), which requires a centralized licence server instance that administers licences throughout an organization. The advantages to the concurrent model are: 1) licences are only allocated when they are being used, 2) licences can be “checked-out” for disconnected use (e.g. used in the field, disconnected from the network), 3) centralized management typically saves time and resources and 4) fewer licences are typically required, as multiple people can access the same licence (at different times).
This works nicely within a secure network (such as an office or headquarters), but many organizations require access at the office and remotely. Furthermore, some organizations have people who work remotely and rarely (or never) come to the “office”. One solution is to host the Licence Server in the cloud and provide your GIS analysts with a secure connection to the environment in order to access the Licence Server, thus providing access at the office and offsite. This post will demonstrate how to set this solution up in Azure and connect to the Licence Server using an Azure VPN. For demo purposes, this post will show how to do this using the Azure Portal; however, the entire process can be scripted using the Azure REST API.
- Create a resource group in Azure Portal
- Navigate to the Azure Resource Manager portal (https://portal.azure.com), and sign in with your Azure account.
- Click the New button (green plus sign) and search for “resource group” in the Marketplace. Select the Resource Group option in the search results.
- Select Create.
- Populate the fields and click Create to create the new resource group. This group will hold all of the components in your new virtual network, including the VM that will be built (see Part 3) to host the ESRI Licence Manager. A resource group is way of organizing related components within Azure.
- Resource group name: ls-resource-group or another name for the resource group.
- Subscription: Choose a valid subscription that is linked to an account.
- Resource group location: Choose a location that is near you.
- Create a virtual network
- Again, click the New button, but this time search for “Virtual Network” in the Marketplace. Select Virtual Network in the results and click Create using the Resource Manager deployment model.
- In the Create virtual network wizard populate the fields.
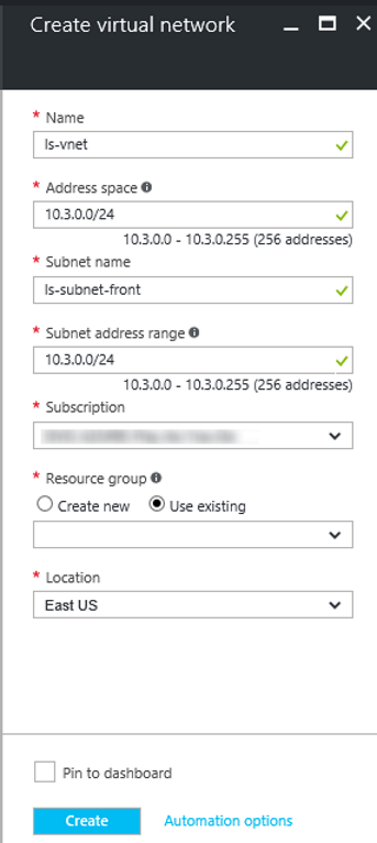
- Name: ls-vnet or another name that describes the network.
- Address space: This is an address range for IPs. You can use 10.3.0.0/24 or use a different range.
- Subnet name: ls-subnet-front or another name (We will create a frontend subnet here and a backend subnet later).
- Subnet address range: 10.3.0.0/24 or some other range.
- Resource group: Pick the ls-resource-group (from Step 1).
- Location: pick the same location as your resource group.
- Click Create.
- Add additional address space for the back end subnet.
- Open the “Address space” in the new network and add the additional address space.
- Add the range 10.25.1.0/16
- Click Save.
- Add the back end subnet (optional). This is useful for separating (firewalling) resources.
- Click on the ls-resource-group in Azure Portal. This will open up the ls-resource-group blade with options.
- Select the ls-vnet. This will open up another blade with options for the ls-vnet.
- Select Subnets. Click the + Subnet button at the top of the blade.
- Name: ls-subnet-back
- Address range (CIDR Block): 10.25.1.0/16 (same as above)
- Click OK.Your new subnet will appear after a few seconds.
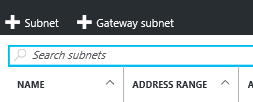
- Create a gateway subnet.
- In order to access the Vnet from the outside, it must be connected through a gateway. The first step in doing this is to create the gateway subnet for the virtual network. According to Azure documentation, it’s best to create a gateway subnet using a CIDR block of /28 or /27 in order to provide enough IP addresses to accommodate future requirements.
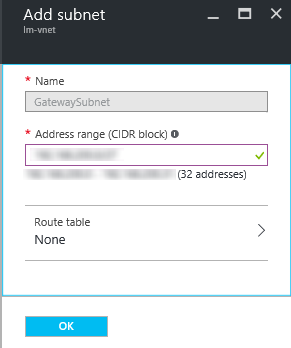
- In the Azure Portal, navigate to the ls-vnet. Next, click the Subnets button under “SETTINGS”. Click the + Gateway subnet button.
- The Name is autopopulated as “GatewaySubnet”, which is required. Update the CIDR block with your desired address range. This example, I will use 192.168.100.0/27. Click OK to create the subnet.
- Optional – customize your DNS server for the virtual network. Here, I am leaving the “Default (Azure provided)” DNS server; however, this could be customized for your organizational name resolution.
- Create a virtual network gateway
- Here, we are creating the physical virtual network gateway. Specifically, I will be creating a Route-based VPN for an Azure Point-to-Site connection.
- In the Azure Portal, click New and search for “Virtual Network Gateway”. Select it and click Create.
- Populate the options: when you get to “Public IP address”, click choose and create a new public IP. This will create a new dynamic IP address for the gateway.
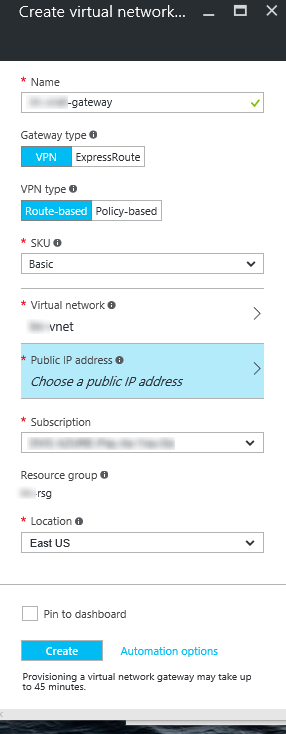
- Click Create.
- Go get a coffee or lunch. This takes around 45 minutes to create.
- After it has been created, you can view the IP address that have been assigned by clicking on it in the Azure Portal.
Once you are done creating the virtual network, please see the next post (coming soon) on creating and applying certificates to the Vnet gateway.